Bruno Malfacine Sequential Drilling 5 - Side Control Transition Stepping Over Head
Add to Favorites Remove From Favorites 1430 2541 days ago
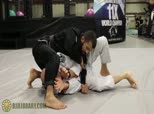
Bruno's opponent shrimps again trying to escape side control, and Bruno keeps his hand controlling the hip. He steps his foot over the head, and as he drops his knee behind the back, his other knee comes up. Keeping the hips trapped with his elbow, Bruno back steps as he swims his other arm inside his opponent's arm to get the cross face and establish side control.
Bruno Malfacine Sequential Drilling 4 - Side Control Jumping Transition
Add to Favorites 1512 Remove From Favorites 2542 days ago
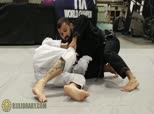
From side control, Bruno's opponent shrimps, so Bruno bases with his near knee up and he pushes his opponent's top knee down, trapping the bottom leg with it. He puts his weight in his arms and jumps over the legs to the other side. His knee goes under his opponent's legs and he pulls him flat on his back before getting the cross face and securing side control.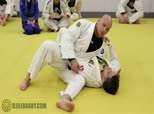
Inside the University 334 - Two Basic Ways to Hold Side Control
Add to Favorites 826 Remove From Favorites 2607 days ago
Xande shows two of the basic ways to hold side control when you are facing your hips toward your opponent. The first and most basic is with your bottom leg in front and your top leg posted with the knee up. However, for this position, he switches his legs so his top leg is in front. This will allow him to slide his hips over the torso when he goes for mount.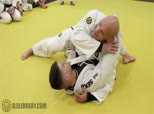
Inside the University 333 - Mounting from Side Control
Add to Favorites 755 Remove From Favorites 2608 days ago
From side control, Xande is anchoring himself down with the underhook and either crossface or a grip on the shoulder, while his opponent tries to face him and push him off. Xande slides his hip up his opponent's torso, and continues sliding his entire leg, until his foot crosses over to mount. Xande emphasizes the importance of using his hip to slide across first, not his knee.
Inside the University 100 - Failed Straight Armlock to Folded Side Control with Transition to Mount, Folded Straight Armlock, or Kimura
Add to Favorites 1569 Remove From Favorites 3651 days ago
In this lesson we learn how to continue our attack with a failed straight armlock where your opponent was able to free their hand and bring it to the other side of your head. Rather than let go of your grip on your opponent's arm, we use this opportunity to transition to a side control with your opponent's arm folded across and pinned to their chest. We have many options to finish from the folded side control position including a transition to the mount, a straight arm lock from the folded side control, or transition back to the keylock to attack the kimura, straight armlock, and americana.
Jackson Sousa Spider Guard Sweeps 6 - Classic Near Side Back Take from Side Control
Add to Favorites 1277 Remove From Favorites 3658 days ago
Jackson Sousa teaches how to take your opponent's back from side control by lifting your opponent's near side hip up to create space and take the back.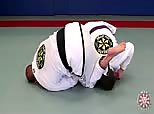
Armbar from the Top Turtle with One Hook In
Add to Favorites 1219 Remove From Favorites 3697 days ago
When taking your opponent's back with the near side hook, often times your opponent will beat you to the other side and block your far side hook from coming in leaving you in an awkward position on the back with only one hook. In this case, many people will continue to try to take their opponent's back but sometimes it's better to attack with a submission instead. In this lesson, Xande teaches how to transition to an armbar from the top turtle with one hook in.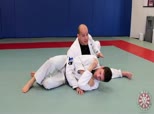
Side Control Transition when Opponent Rolls In with the Spinaround to Side Control or Backtake
Add to Favorites 3561 Remove From Favorites 3697 days ago
Your opponent may bridge and roll in to you as you're passing the guard or find a way to bridge into you to break the pin from side control. If your opponent is already on their side, it may be hard to re-establish control of the position. Rather than letting them reestablish their guard, spin around to the back side instead to reestablish your side control or to transition to the back.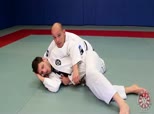
Side Control Transition to the Back with Near Side Hook or Garcia Roll when Opponent Rolls Away
Add to Favorites 2551 Remove From Favorites 3698 days ago
In this lesson we learn how to transition to a back take when your opponent rolls away from you and you were unable to stop their movement. Sometimes it is better to make a transition instead of trying to force our opponent pinned to stay one step ahead of them. We learn to take the back using the near side hook or with the far side hook with the Garcia Roll when your opponent turns away and attempts to make a running escape from your side control.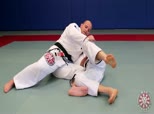
Options to Transition to Mount from Hip to Shoulder Side Control
Add to Favorites 2336 Remove From Favorites 3699 days ago
Xande continues his series on how to transition to the mount from the side control from the reverse kesa gatame (hip to shoulder side control). In this lesson, we learn three classic ways to get our leg across to establish the full mount position.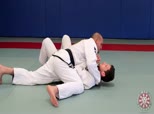
Hip to Hip Side Control Transition to the Mount via Knee on Belly
Add to Favorites 2515 Remove From Favorites 3700 days ago
Xande teaches one of the most common and fundamental ways to transition from side control to the mount position. In this lesson we start from the hip to hip side control and bring our knee along the line of our opponent's belt to transition all the way to the mount.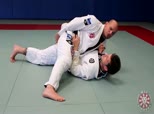
Controlling Side Control with Hip to Hip or Hip to Shoulder
Add to Favorites 2027 Remove From Favorites 3701 days ago
Xande teaches how to position your body in the side control with your hip to your opponent's hip or hip to their shoulder to maintain a dominant side control. Depending on how your opponent reacts, you may have to mold your weight distribution to a different point of control to keep your opponent pinned to the ground. We learn that there are three points of control to apply pressure to control our opponents: the hips, the shoulders, or the neck. By understanding to apply pressure to these three points of control and how they work in pinning your opponent, we can begin to create a more dynamic strategy to control your opponent in the side control.