Inside the University 96 - Shoulder to Shoulder Side Control to Guillotine
Add to Favorites Remove From Favorites 1229 3915 days ago
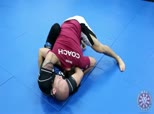
In this lesson we learn to set up the guillotine from the shoulder to shoulder side control and work to finish the submission from the guard or the mount. Xande covers details such as how we should twist our opponent's neck rather than falling straight back when attempting to finish the submission.
Inside the University 95 - Passing Knee Shield and Shoulder to Shoulder Side Control to North South Choke
Add to Favorites 1069 Remove From Favorites 3917 days ago
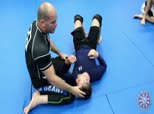
Xande covers some details on passing the knee shield into the shoulder to shoulder side control and setting up the north south choke.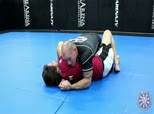
Inside the University 92 - No Gi Turtle to Forced Half by Knee Pick to the Mount or Arm Triangle
Add to Favorites 1018 Remove From Favorites 3931 days ago
Xande teaches how to force the half guard on your opponent when they are in the turtle position and looking to roll away from you to retain their guard. We use a knee pick to force the half guard as our opponent attempts to retain their guard and immediately trap their head and arm to set up for the mount or arm triangle submission.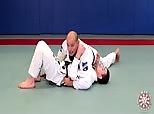
Hip to Shoulder Side Control to Breadcutter by Switching Sides
Add to Favorites 1048 Remove From Favorites 3936 days ago
The breadcutter submission may be hard to execute successfully if your opponent is able to anticipate your actions. In this lesson we learn to confuse our opponent by switching from the hip to shoulder side control to our opponent's other side to finish the submission.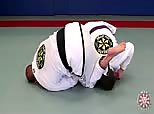
Armbar from the Top Turtle with One Hook In
Add to Favorites 1219 Remove From Favorites 3938 days ago
When taking your opponent's back with the near side hook, often times your opponent will beat you to the other side and block your far side hook from coming in leaving you in an awkward position on the back with only one hook. In this case, many people will continue to try to take their opponent's back but sometimes it's better to attack with a submission instead. In this lesson, Xande teaches how to transition to an armbar from the top turtle with one hook in.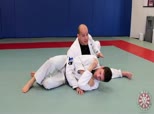
Side Control Transition when Opponent Rolls In with the Spinaround to Side Control or Backtake
Add to Favorites 3565 Remove From Favorites 3939 days ago
Your opponent may bridge and roll in to you as you're passing the guard or find a way to bridge into you to break the pin from side control. If your opponent is already on their side, it may be hard to re-establish control of the position. Rather than letting them reestablish their guard, spin around to the back side instead to reestablish your side control or to transition to the back.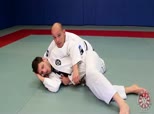
Side Control Transition to the Back with Near Side Hook or Garcia Roll when Opponent Rolls Away
Add to Favorites 2554 Remove From Favorites 3940 days ago
In this lesson we learn how to transition to a back take when your opponent rolls away from you and you were unable to stop their movement. Sometimes it is better to make a transition instead of trying to force our opponent pinned to stay one step ahead of them. We learn to take the back using the near side hook or with the far side hook with the Garcia Roll when your opponent turns away and attempts to make a running escape from your side control.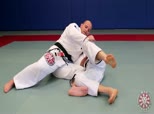
Options to Transition to Mount from Hip to Shoulder Side Control
Add to Favorites 2336 Remove From Favorites 3941 days ago
Xande continues his series on how to transition to the mount from the side control from the reverse kesa gatame (hip to shoulder side control). In this lesson, we learn three classic ways to get our leg across to establish the full mount position.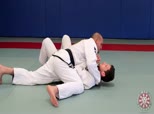
Hip to Hip Side Control Transition to the Mount via Knee on Belly
Add to Favorites 2515 Remove From Favorites 3942 days ago
Xande teaches one of the most common and fundamental ways to transition from side control to the mount position. In this lesson we start from the hip to hip side control and bring our knee along the line of our opponent's belt to transition all the way to the mount.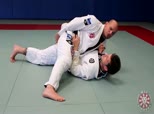
Controlling Side Control with Hip to Hip or Hip to Shoulder
Add to Favorites 2027 Remove From Favorites 3943 days ago
Xande teaches how to position your body in the side control with your hip to your opponent's hip or hip to their shoulder to maintain a dominant side control. Depending on how your opponent reacts, you may have to mold your weight distribution to a different point of control to keep your opponent pinned to the ground. We learn that there are three points of control to apply pressure to control our opponents: the hips, the shoulders, or the neck. By understanding to apply pressure to these three points of control and how they work in pinning your opponent, we can begin to create a more dynamic strategy to control your opponent in the side control.
Inside the University 81 - Side Control Escape Concepts and Combining the Frame Hip Escape with Running Escape
Add to Favorites 1850 Remove From Favorites 3955 days ago
Saulo teaches the concept of how to frame against your opponent's body to survive in the position and posture yourself to make an escape. In this lesson we learn how to escape from the standard side control as well as most other variations your opponent may use to pin you in the side control. We learn that your opponent has the edge in the position and so we must anticipate their attacks and be quick with our escape attempts.
Inside the University 68 - Advanced Details on Guard Retention and the Knee Cross Pass, X-Pass, Same Side Knee Pass Combos
Add to Favorites 2251 Remove From Favorites 4002 days ago
Xande goes into the details on what to look for to retain your guard and mentions that you want to keep your opponent off your three points of control (neck, shoulders, hips) to stay mobile and capable of retaining your guard. We also take an advanced look into the knee cross pass, x pass, and same side knee pass and examine how lifting your foot off the mats can neutralize the strength of the De la Riva guard and allow you to remain loose and glide over your opponent into a passing opportunity.