Controlling the Mount
Add to Favorites Remove From Favorites 2427 3929 days ago
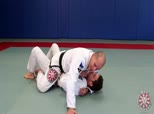
The mount is one of the highest scoring positions in competition jiu jitsu along with the back position because it is a dominant position that allows you to attack your opponent when your opponent is unable to pose a physical threat from underneath the mount. Xande teaches some of the fundamental concepts on how to control your opponent once you have mounted them including how to position your weight and how to transition to control your opponent even when they attempt to escape.
Side Control Transition to the Back with Near Side Hook or Garcia Roll when Opponent Rolls Away
Add to Favorites 2554 Remove From Favorites 3935 days ago
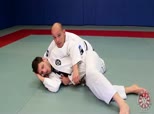
In this lesson we learn how to transition to a back take when your opponent rolls away from you and you were unable to stop their movement. Sometimes it is better to make a transition instead of trying to force our opponent pinned to stay one step ahead of them. We learn to take the back using the near side hook or with the far side hook with the Garcia Roll when your opponent turns away and attempts to make a running escape from your side control.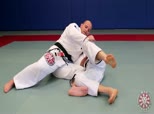
Options to Transition to Mount from Hip to Shoulder Side Control
Add to Favorites 2336 Remove From Favorites 3936 days ago
Xande continues his series on how to transition to the mount from the side control from the reverse kesa gatame (hip to shoulder side control). In this lesson, we learn three classic ways to get our leg across to establish the full mount position.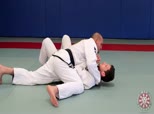
Hip to Hip Side Control Transition to the Mount via Knee on Belly
Add to Favorites 2515 Remove From Favorites 3937 days ago
Xande teaches one of the most common and fundamental ways to transition from side control to the mount position. In this lesson we start from the hip to hip side control and bring our knee along the line of our opponent's belt to transition all the way to the mount.
Inside the University 80 - Escaping High Mount, Grape Vine, and Technical Mount
Add to Favorites 1409 Remove From Favorites 3951 days ago
In this lesson we address the situations from the mount in which the knee elbow escape will not work. For the high mount and the grape vine, we use a modified approach to the knee elbow escape and use a hip bump to create the space to free your bottom knee underneath your opponent's leg to create the mobility and space to escape.
Inside the University 79 - Mount Defense by Combining Knee Elbow and Bridge Escapes
Add to Favorites 1375 Remove From Favorites 3954 days ago
Saulo teaches the mindset on how to initiate the knee elbow escape and the traditional bridge (upa) escapes. He talks about how your defense to the mount should be more expplosive than your opponent's attack and that in the case of defending the mount, it's ok to train only one side to sharpen the reaction time as much as possible. The mount is a position where your opponent has a lot of control over your body and the best time to escape the position is during the transition to the mount, before they are able to establish full control.
Gordo the Creator of Half Guard 8 - Palm Up Palm Down Collar Choke from the Mount
Add to Favorites 1603 Remove From Favorites 3984 days ago
Gordo teaches the classic palm up palm down collar choke from the mount. He explains that a lot of people don't use the mount even though it's a highly dominant position because it can be difficult to learn how to control your opponent from the position. Gordo walks us through how to distribute your weight while setting up the choke and how to use our head to post on the ground to stop our opponent from bumping us off the mount.
Inside the University 65 - Failed Back Control to Mount Transition and Mount to Back Transition
Add to Favorites 1212 Remove From Favorites 4004 days ago
Xande teaches the failed back control to mount and mount to back transition. We learn a key detail to cross your leg across your opponent's hip and establish a katagame grip with your arm to transition from the back to the mount without giving your opponent an opportunity to escape.
JJU 37-07 Triangle Choke from the Mount
Add to Favorites 2110 Remove From Favorites 4010 days ago
Xande teaches how to set up the triangle choke submission from the top mount position.
Inside the University 60 - Failed Breadcutter to Saulo Choke from Mount
Add to Favorites 1230 Remove From Favorites 4012 days ago
Saulo teaches a transition from a failed breadcutter to the Saulo choke from the mount. The Saulo choke is a variation to the over under choke from the mount but rather than pulling our opponent towards our chest with both grips we use one forearm as a blade and brace on their neck and pull on the lapel with the other hand to tighten the noose.
Dean Lister Footlock Machine 6 - Wristlock from the Mounted Americana
Add to Favorites 1123 Remove From Favorites 4059 days ago
Dean teaches how to transition to a wristlock from the mounted americana when your opponent is pushing their arm up stop you from finishing the americana.
White Belt University 6.6 Transitions - Side Control to Mount and Mount to the Back
Add to Favorites 1610 Remove From Favorites 4067 days ago
Saulo teaches how to mount your opponent from side control as well as how to go from the mount position to your opponent's back.